
Dash Upgrades
In this section, I have included several projects containing swapping instrument clusters and climate control in OEM style.
Silverado Digital Instrument Cluster
The Digital Instrument cluster gives the driver more customization choices for the information they want to know while they are driving. Some digital instrument cluster also includes turn-by-turn navigation for the driver, so when they are driving, they can keep their line of sight without turning their head to the head unit screen.
This modification aims to replace the old instrument cluster on my 2014 Silverado with a digital instrument cluster.
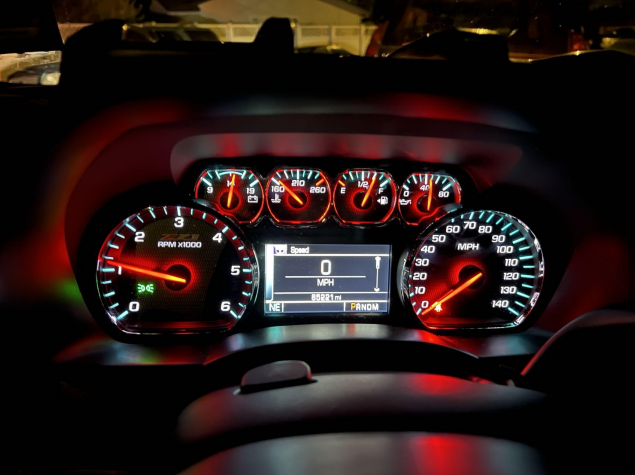
Current Instrument Cluster
The benefit of the digital instrument cluster
- Accurate number read out
- Added total fuel usage display
- Added navigation display on the cluster
- Selectable cluster layout
- Enable steering wheel control for Siri and Google Assistant (Replace OnStar when Carplay or Android Auto is active)
The 2014 model did not offer a digital cluster option. However, the vehicle's internal layout has not been changed from the 2014 to 2018 models. Additionally, Chevrolet Silverado, Chevrolet Tahoe, Chevrolet Suburban, GMC Sierra, GMC Yukon, and Yukon XL all use the same instrument cluster, including mounting method and wiring layout. The digital cluster is only available on Chevrolet Tahoe Premium, Chevrolet Suburban Premium, GMC Yukon Denali, and GMC Yukon Denali XL starting from 2016. The only difference between GMC and Chevrolet clusters are the LED colors. The Chevrolet uses Blue LEDs while GMC is using Red LEDs.
For this upgrade, I salvaged a digital instrument cluster from a 2016 Chevrolet Tahoe from the junk yard.
I took apart the instrument cluster housing in my vehicle and took out the old cluster. Then I repositioned the wiring harness from the right side to the left side because the digital cluster’s plug is on the left side.
After the preparation, I simply bolt on the new digital cluster to the vehicle and put it back in the housing. The digital cluster is still registered with the previous car’s VIN. I used the ACDelco Service Programming System (SPS2) and GM Light Duty Global Diagnostics 2-GDS 2 to change the VIN registered on the Digital cluster to my vehicle’s VIN.

Result
Upon testing, all the functions are working. The steering wheel controls can be used to call out Siri. The digital cluster gives more detailed information about the vehicle. However, the off-road vehicle display is not working due to no CANbus signal from the factory. The door opening animation shows Chevrolet Suburban animation rather than Silverado animation.
Bronco Sport Climate Control With Temperature Display
The 2022 Bronco Sport comes with a climate control panel without a temperature display. The reason for excluding the temperature display is due to supply chain delays. The climate control panel with temperature display has extensive delays which affect the overall vehicle delivery for the manufacturer.
I acquired a climate control unit with a temperature display from a wrecked 2021 Ford Escape. Since Ford Escape shares the same platform as Ford Bronco Sport, the unit can be swapped without any panel fabrication.

The climate control panel is at the very bottom of the dash, so in order to get to the panel, the entire front dash and center console need to be taken off.

Since there is no existing documentation for taking apart the dash, so I first have an inspection of the panels and lay out the steps to remove the dash.
In order to take apart the dash, the first step is to take off the head unit screen. There are three 7mm screws at the back of the screen under the cover panel. After taking out the three screws, the screen, media control, and center vents can be gently pulled out. After removing two cables at the back of the screen, the unit can be taken off and set aside.
Next is to remove the four screws behind the screen unit, pull up the cover in front of the cluster, and remove two screws behind the cover. This will release the top cover and the middle shelf of the dash. Before pulling out the dash cover, the start/stop button needs to be removed in order to free the dash panel.
With the dash removed, the next is to take off the center console panels to lower the climate control unit enclosure. I removed the center console panel with shift know attached and rotated it to the side. Then removed two 10mm screws on each side of the center console to release the center console side panels. Once the side panels release, I pry out the bottom cover of the climate control unit to get access to two 7mm screws.
With that removed, I am able to reach the 4 back screws that hold the climate control unit to the dash. I disconnected the old climate control unit and plug in the new climate control unit.
Before I install everything, I plugged back the screen and the start-stop button to do a test. Upon testing, all the units are functioning normally. So I reverse the steps to put back all the panels.

Result
The climate control panel with a temperature display gives the driver a direct visualization of the cabin temperature at each zone. The temperature display will give the temperature reading when the head unit is turned off. This new panel decreases the time for the driver to look off the road. And it is easier for the passenger side to adjust the temperature accurately without distracting the driver.